The Wonderful World of Hammocks!
Problem with Integrated Mosquito Net...
2017-04-21 I have been very pleased with my two Snugpak Jungle Hammock with integrated Mosquito net. They are easy to set up and easy to enter and leave. Seems ideal. Then Friday we had an incident that is making me rethink the integrated concept. The incident is not an uncommon one. My two son's and I are preparing for a three night backpacking trip to the Porcupine Mountains Wilderness State Park in the UP of Michigan the first weekend of May. For my two son's I put together systems using the snugpak hammocks. Friday my son who lives here in town came over so we could set it up. I wanted him to see how its done before we go and maybe even "play" with it a bit himself before then. We hung the hammock, hung the Snugpak Hammock Underblanket beneath it and then put the shock cords on to hold the mosquito net up. We also strung up but didn't deploy the tarp.
Then he climbed in. Only he got the underblanket and hammock all mixed up and ended up tipping over backwards - TEARING THE MOSQUITO NETTING ALL TO PIECES! THAT is what made me think again about the integrated concept. Suddenly, with one mistake both hammock and the netting are dysfunctional!
We salvaged the hammock by carefully cutting away the remaining mosquito netting so all is not lost. And I ordered an ENO Guardian Bug Net so we are back in business. But I think in future I will get hammocks without the bugnet. You give up the amazing convenience of the integrated approach but may run less risk of a "tragedy" in the field!
Another Tarp
2017-03-08 I needed one more tarp to complete my three hammock setups. So I ordered the Yukon Outfitters Walkabout. It is identical to the Bear Butt tarp in size and seems like the identical material. The Bear Butt had a bit better stakes but even the cordage seems identical.
2017-02-06 A rain fly or tarp is essential for hammock camping. The the ENO OneLink Hammock Shelter System comes with the ENO Profly Rain Tarp. At 10-1/2 x 6-1/2 feet it is intended to be used in a rectangular setup. It weighs 1-1/2 lbs. I haven't used it in the rain but I did sleep under it a few weeks back and it seems to cover well. It is very light weight and easy to deploy. For my Equip Mosquito Hammock setup I have a tarp I got off Amazon some months back. It is quite large at approximately 9-1/2 by 10 feet and weighs 2 lbs. It can can be used in either the diamond or rectangular configuration.
|
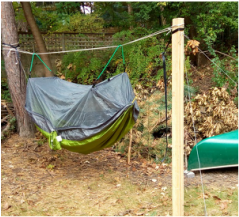
I didn't have a tarp for the Snugpak Jungle Hammock with integrated Mosquito net yet. But that problem was solved today when the mail man delivered a Bear Butt Rain Fly. It measures about 9-1/2 by 10-1/2 feet and weighs 1.1 lbs including its stuff sack, cords and two aluminum stakes. It only has four tie outs so is intended to be used over a ridgeline or in a diamond configuration. The temperature reached 52 degrees today so I set up my outside hammock support, put up my Snugpak Jungle Hammock with integrated Mosquito net and then deployed the Bear Butt Rain Fly.
The coverage in the diamond configuration is more than adequate. Except for a driving rain it should keep one dry. I think it will serve very well.
|
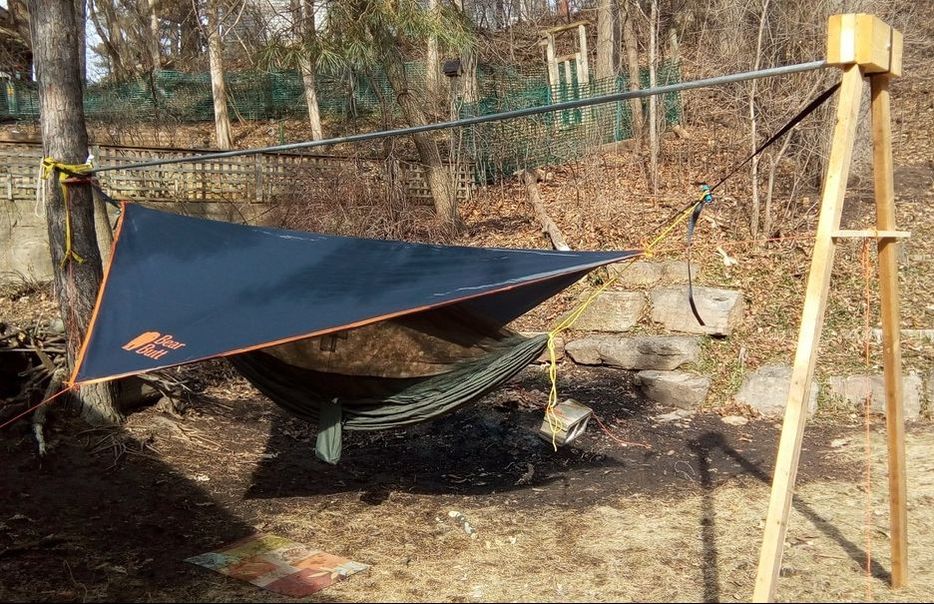
Snugpak Jungle Hammock with Mosquito Net and Bear Butt Rain Fly.
|
2017-02-05 Well, it turns out I don't have my final hammock setup(s) yet! Guess that is no surprise. My eleven year old grandson told me again yesterday that he wants to go hammock camping with me. That got my juices flowing again! Somehow after that I found myself looking at Snugpak stuff again. And I ended up ordering their Snugpak Jungle Hammock with integrated Mosquito net from Amazon. It came today! So I headed out to the garage after church and lunch to play around with it and various underblanket, top quilts, sleeping bags, etc.
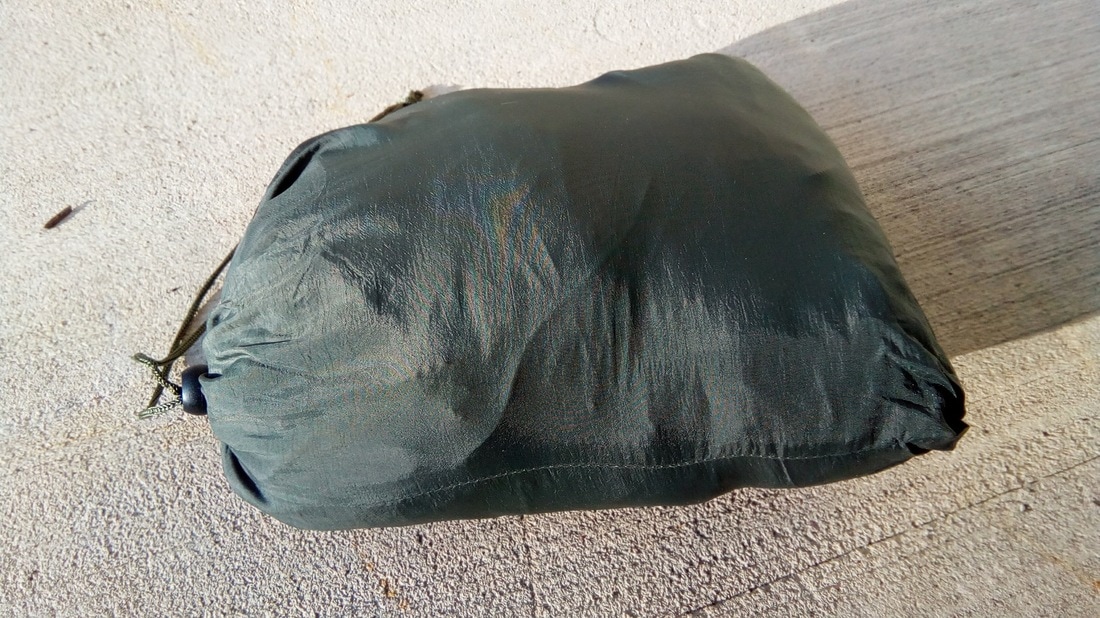
Snugpak Jungle Hammock with Mosquito Net in its attached stuff sack.
|
First off, I am very impressed with the hammock! I replaced the paracord hanging straps and heavy carabiners with some whoopee slings, tree straps and toggles I had previously made up. The whole package pictured at left weighs 1.7 lbs. and measures about 7x10 inches. The identically set up for my Equip Mosquito Hammock from Walmart weighs 2.7 lbs and measures about 8x11 inches.
The quality of the mosquito net is similar to that of the Equip hammock. It my be a bit lighter than what the ENO uses but not much. The Equip hammock has zippers on both sides while the Snugpak one only has one zipper on one side. I believe the lay in the Snugpak is a bit better. The fabric is quite a |
|
bit lighter (similar to the ENO Double Nest) and seems to fit nicer than the Equip. I didn't have them both set up at the same time so my comparison is somewhat subjective. But overall I think I prefer the Snugpak to the Equip. Interestingly the cost is almost identical, just under $40. One nagging thought I had while laying in the Snugpak Jungle Hammock is that it may be as if nor more comfortable than the ENO, even if it is considerably narrower.
Testing underblankets top quilts with the Snugpak Jungle HammockThe next order of business was to compare my three underquilt options. The temperature in the garage was about 40 degrees when I did this.
|
Snugpak Jungle Hammock with Snugpak Underquilt.
|
My first test was with my DIY Costco Down throw. I've rigged it up with eyelets across the ends with snap cord that goes to the suspension. It fits quite nicely. After fitting it under the hammock I climbed in, covered up with another down throw as a blanket and laid their for about half an hour. Topside was plenty warm. But the bottom side was cool and didn't seem to warm up. It wasn't cold so I'm guessing that if it were about 50 or above it would be fine. But at 40 degrees, it is not adequate.
The next test was with my Yukon Outfitters Kindle under quilt. On top I used one of my Ozark Trail 40 degree sleeping bags. That was an excellent combination. I was warm all over almost immediately! Clearly a winning combination at 40 degrees anyway. When I tried the Yukon Kindle quilt earlier with my ENO Double Nest hammock I felt like I couldn't get a good diagonal lay and keep my feet inside the underquilt. That didn't seem to be as much of an issue with the Snugpack Jungle hammock. I'll have to try it with the ENO again. Perhaps I am just a bit more experienced now!
Next up was the Snugpak Hammock Underblanket and Hammock Quilt. I was anxious to see how an all Snugpak setup would work. The underblanket did not seem quite as warm as the Yukon Outfitters Kindle. But it warmed up nicely and I had no problem maintaining full cover regardless of how I laid in the hammock. Suspension was a bit more complicated and took more fiddling to get it hung right. But the complete coverage is great. The Hammock Quilt didn't seem quite as warm as my Ozark Trail sleeping bag but again was adequate. It was a little easier to get into and get situated in the hammock.
My conclusion? I think all three underquilt options I played with would be fine when the temperatures are 50 or above. Below that either the Snugpak underblanket or the Yukon Kindle would work, with the Kindle being a bit warmer. As to top cover, I'm sold on the top quilt concept. When I slept outside several weeks ago when it was in the 30's I used a 5 degree sleeping bag as a sleeping bag. It was really difficult to get into the bag. Now having used both a genuine top quilt and a sleeping bag as a top quilt, that is MUCH EASIER to do. I don't think I'll ever zip up a sleeping bag in a hammock again.
Snugpak Underquilt
|
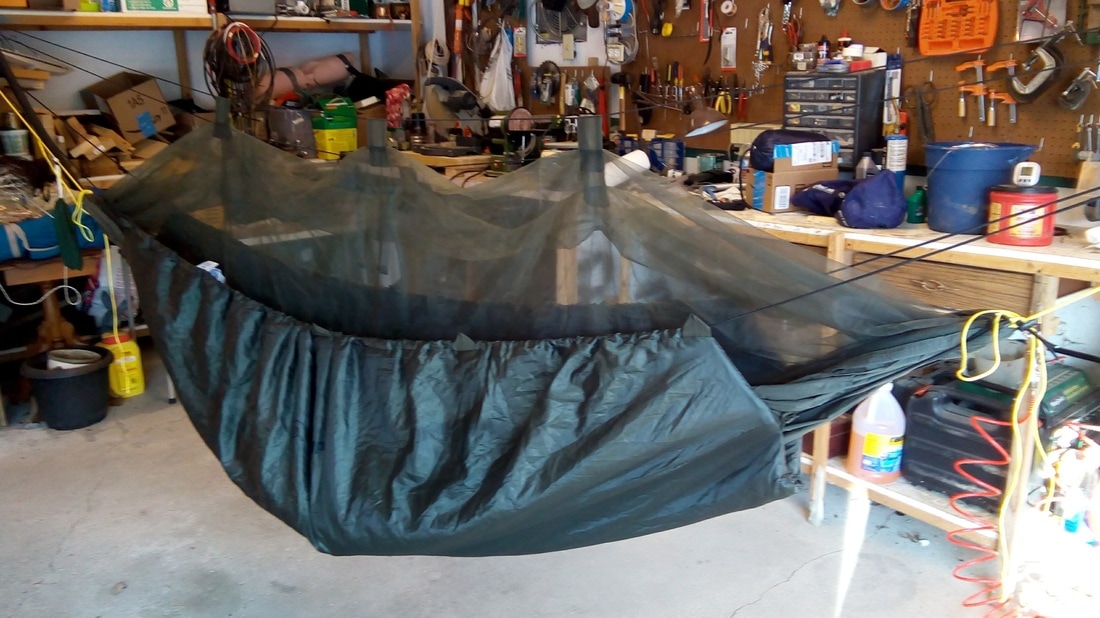
2017-01-15a My Snugpak Hammock Quilt came today. So with everything else ready to go I headed to the garage for another garage hang.
 ENO DoubleNest hammock suspended beneath the ENO Pro Fly tarp (still in the skin) with the SnugPak Under Blanket suspended beneath. Not visible is the Snugpak Hammock Quilt inside the hammock. ENO DoubleNest hammock suspended beneath the ENO Pro Fly tarp (still in the skin) with the SnugPak Under Blanket suspended beneath. Not visible is the Snugpak Hammock Quilt inside the hammock.
It was about 37 outside and 40 in the garage, pretty nice for a January day in Wisconsin. The photo at left shows everything suspended, with the tarp still in its skin.I laid in the hammock for about 30 minutes and was nice and warm in the Hammock Quilt and Snugpak Under Blanket though my backside did seem just a bit less warm than I expected.
I then put one of my Costco Down throws between the under blanket and the hammock and tried it again for another half hour. It was so comfortable that I fell asleep! Guess it works!
|

All comfortable in my hammock in the garage. Not sure why the picture is a mirror image of the actual!
|
|
2017-01-15 Got a bad cold today and so stayed home from church. Have enjoyed listening to Christian music on the Internet, reading my Bible and other Christian material, and drinking lots of tea and water, with consequent trips to the you-know-where!
Then my mind began wondering to hammocks and backpacking. I began wondering if I could put this "final" hammock kit into the bottom compartment of my backpack, a deuter act lite 65+10 from REI. Empty the pack weighs five pounds.
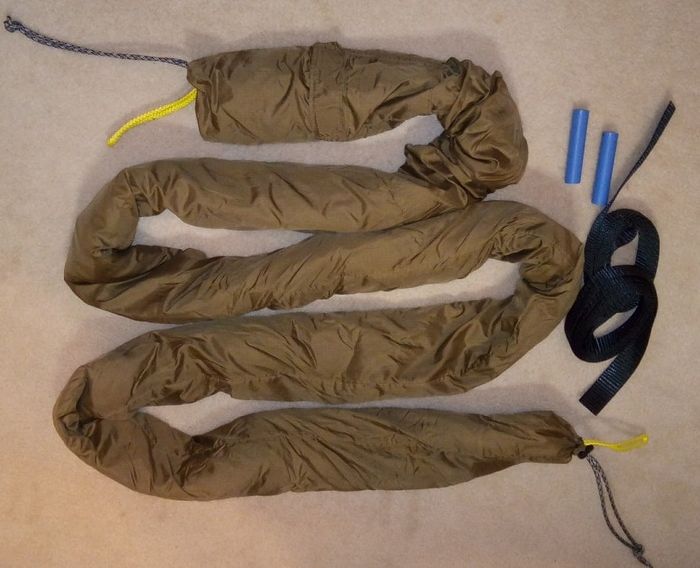
Indeed, the hammock, bug net, tarp and all the straps, steaks and everything else shown in my kit below fits, even loosely, in that bottom compartment! I put each item in individually and did not use the ENO stuff sack.
The final weight of the otherwise empty pack plus hammock kit is nine pounds, a net weight of 4 lbs for the hammock kit.
I'm getting excited! Just have to completely heal from some recent surgery, wait for a couple warm days and I can test all of this out for real at a nearby state park. Hanging in the garage and backyard is better than nothing but NOT what I'm looking for!
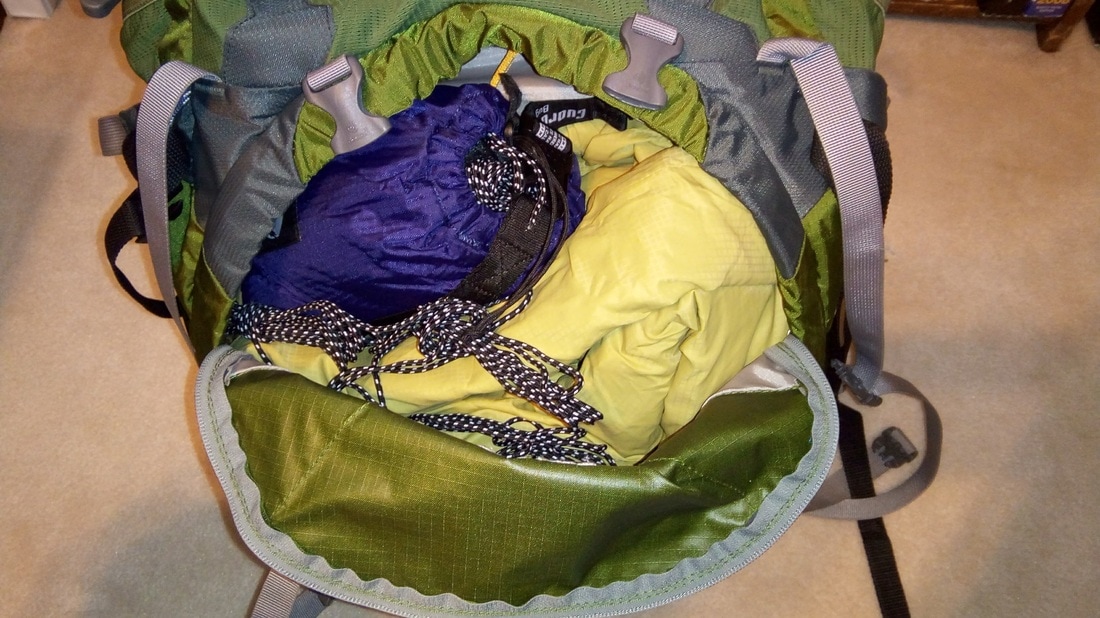
Hammock kit in the bottom compartment of my backpack with room to spare.
|
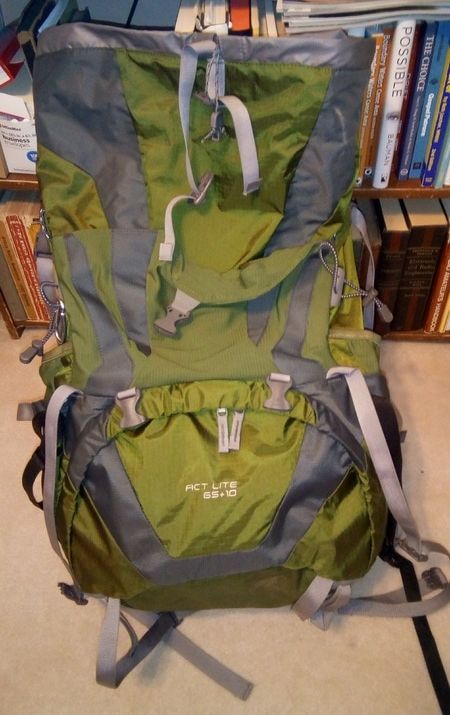
Deuter Act Lite 65+10 backpack with the hammock kit loaded in the bottom compartment.
|
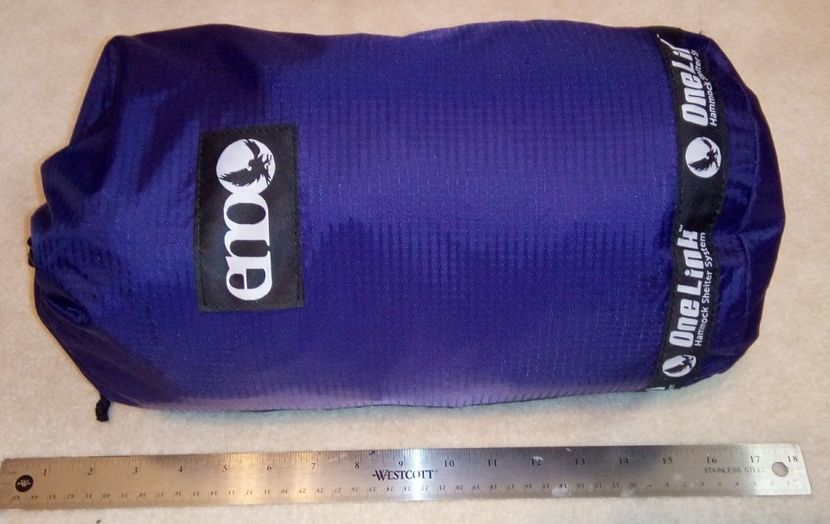
My Modified ENO OneLink Hammock Shelter System packed in its provided stuff sack. Weighs 4.4 lbs.
The Hammock: ENO DoubleNest hammock. I replaced the black nylon rope through the gathered ends of the hammock that came with it with Amsteel continuous loops.
Suspension System: The OneLink system came with Atlas Straps and carabiners. I replaced the straps with one inch tree straps six feet long. and DIY amsteel whoopee slings.
|
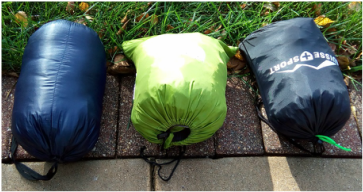
2017-01-13 OK, I know there is no "final" hammock or any other hiking/backpacking/camping kit. Period. But here is where I am at the moment. I started off with the ENO OneLink Hammock Shelter System. Here is what I have now. It all fits into the original OneLink system stuff sack with room to spare.
It weighs in at 4.4 lbs (about 0.1 lbs less than the original package) which includes the stuff sack, tarp, hammock and suspension, bug net and Hammock/Tarp Skins as pictured at right. If you put the contents into your backpack without the stuff sack the weight would be about 4.2 lbs.
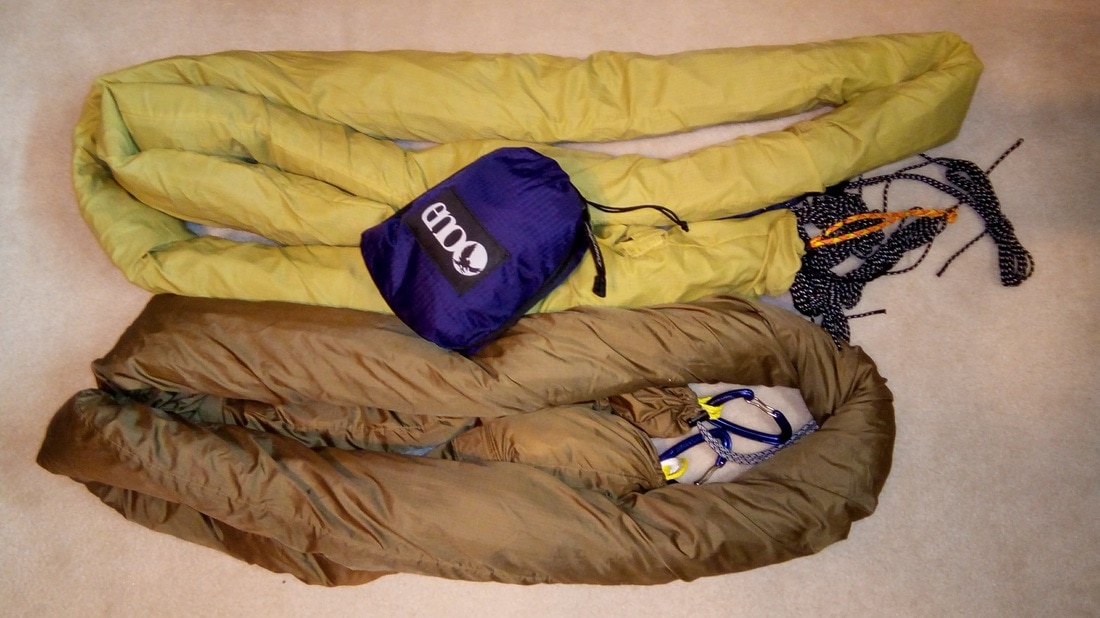
Modified ENO OneLink Hammock Shelter system contents: Profly Rain Tarp (tan skin), DougleNest Hammock and suspension (brown skin, BugNet (blue bag). Gear weight as shown is about 4.2 lbs.
|
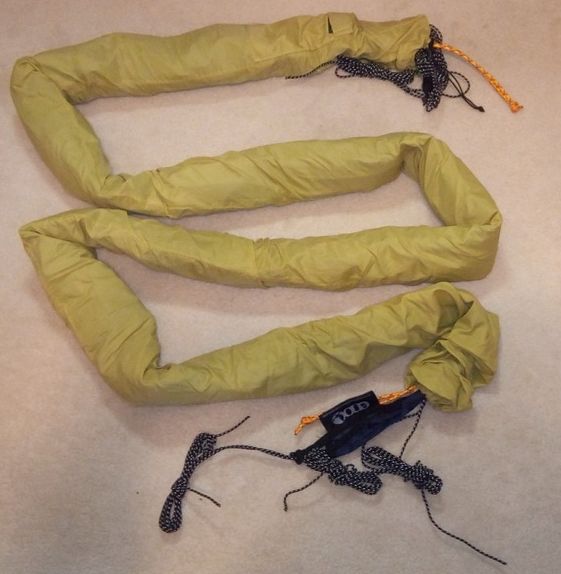
ENO ProFly rain tarp in its Hammock/Tarp Skin from eBay.
|
ENO DoubleNest Hammock in the Hammock/Tarp Skin that I got off eBay. Tree straps and toggles on the right.
Tarp: The tarp is the ENO Profly rain tarp that came with the ENO OneLink system. I also put it in a Hammock/Tarp Skin from eBay.
|
Stuff Sacks: Both the hammock and tarp came with nicely sized individual stuff sacks. The one on the hammock is sewed onto the hammock itself. I replaced the tarp stuff sack with a Hammock/Tarp Skin on eBay which makes setup a lot easier and quicker. The four tent stakes that came with the tarp are in a small stuff sack in the end of the skin. I used another Hammock/Tarp Skin on eBay for the hammock with the structural ridgeline attached.
The Hammock/Tarp Skin from ebay measures 4 inches by 15 feet when shipped. My wife kindly cut off a few feet of both skins and sewed on new end seems so they fit both the tarp and hammock with less surplus material at the ends. The whoopee slings are attached to the hammock while the straps and toggles are in a small stuff sack kept in the end of the skin. So for both the tarp and hammock everything needed is inside the skins. Both cam be strung while still in the skins making them quick to string up and keeping them off the ground. Once strung all you have to do is slide the skin to one end.
Conclusion (as of today): Weight wise, the modified OneLink Hammock Shelter system comes in at about a pound and a half less than a tent system, both without any under or over insulation. An underblanket (Snugpak Hammock Under Blanket for example) adds about three pounds to a hammock. A sleeping pad (Thermarest Trail Scout Regular for example) adds about a pound and a half to the tent. One would use a similar sleeping bag or top quilt for either the tent or hammock so for comparison that is not a consideration. Result? My tent plus sleeping pad weighs 7.6 lbs. My Hammock plus underquilt weighs 7.4 lbs, or the same!
The hammock package allows a bit more flexibility in packing because the individual parts are flexible and compressible and could probably pack with other stuff in a backpack better. I think the hammock system might erect a bit easier and quicker and would be more forgiving of site selection - provided there are trees to hang from. The tent accommodates two people so is a bit more "couple friendly". It also provides a bit more privacy, though probably having used on quite a bit, getting dressed in a small tent requires considerable gyration!.
In the end, logic does not give the answer! "Personal desire is the answer!"
In the end, logic does not give the answer! "Personal desire is the answer!"
Hammocks for backpacking/camping
|
2016-10-29 I think I'm very close to a fully functional hammock setup that includes the Walmart Equip Mosquito Hammock with tree straps, ridgline and whoopee slings (3lbs), a 12x12 ripstop nylon tarp with steaks and cord to tie it off (2lbs) and my DIY Costco Down Throw based underquilt with hanging cord (1lb). So the total packed weight is 6lbs. That is not particularly light weight but is reasonable for carrying in a backpack. Given its light weight, the underquilt is probably good down to the mid 40s though I have not really tested it. It has been a fun project to get the whole setup together. Now for the courage to actually try it out in an overnight situation!
|
Underquilt, Hammock & Tarp weighing 6lbs. Hammock and tarp only weigh 5 lbs.
|

Mattress & Tent weighing 7.6 lbs. Tent with footprint weighs about 6 lbs.
|
By comparison my REI Passage 2 tent and footprint weigh 6lbs. Add my Therm-a-Rest Trail Scout Regular Mattress weighing 1.6lbs and the total tent based setup weighs 7.6lbs. One key difference is that by just adding an additional mattress the tent becomes a two person shelter. So for two people the total tent setup would weight just over 9 lbs while 12lbs would be required for two hammock packages. So thinking just about weight, for one person it is more or less a toss up whether I should carry the tent or the hammock setup. For two people the tent would be the lighter choice.
But these choices are seldom made from practical considerations! |
|
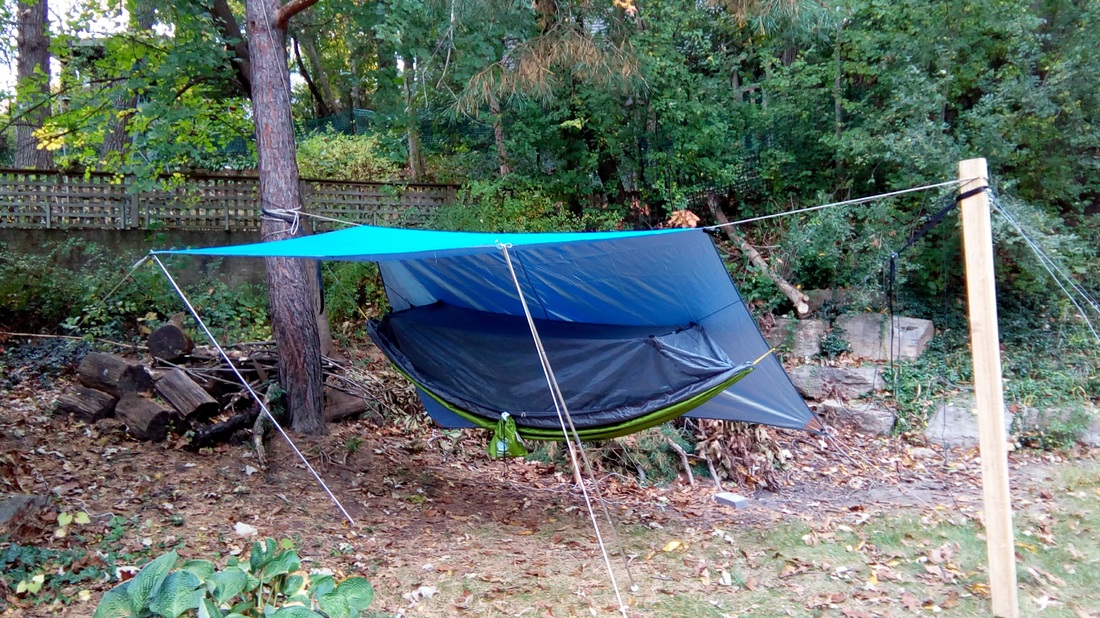
2016-10-25 Thanks to a YouTube video I watched a couple days ago the thought of using a "bi-pod" instead of a mono-pod for my hammock support came up. The idea is that the hammock hangs between the tree and the bi-pod with a rail that goes from the top of the bi-pod to the tree. That rail, under compression is what actually supports the hang pressure rather than guy lines and ground anchors with the single post.
Since I had a couple 8ft 2x4s in the garage and some 2x6 scrapsas well as two 8 ft lengths of chain link fence top rail, yesterday I built one. Today I set it up. I also made a whoopee sling ridge-line and added it to the hammock which I think it made a difference in how the hammock lays. The ideas for that came from this YouTube video, https://youtu.be/xrfBrIEH2-U. Another thing I did today was |
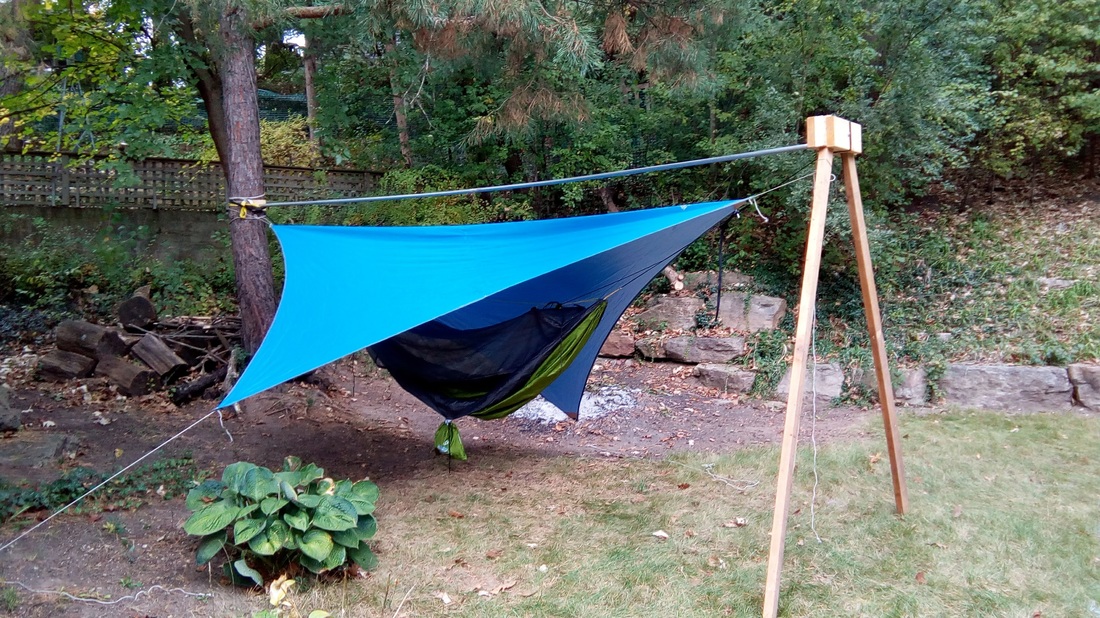
Bi-pod setup using a ridgline and tarp in a diamond configuration
|
to set up my 12ft square tarp in a diamond configuration. That clearly gives more hammock cover. Whether it provides more wind shelter I don't know. The good news is that none of this fell down when I climbed in! As soon as I get the package of cord locks I ordered on Amazon I'll try rigging my under quilt to the hammock. If I keep this up I may have to try sleeping in this thing!
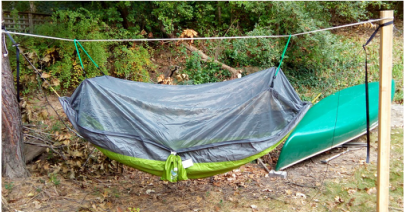
2016-10-21 After taking down the tarp and hammock I decided to weigh them all packed up. The hammock, tree straps, whoopee slings and mosquito net cords weigh 2.8 lbs in the stuff sack that is sewn onto the hammock. The tarp, cordage and tent pegs used to tie it down in the stuff sack weigh 2.1 lbs. The two six-foot aluminum tent poles I used to hold the front of the tarp up weigh 1.1 lbs. making the whole package weight right at 5 lbs., about the same as my REI Passage 2 tent with ground cloth. So this is not the most weight efficient setup. Perhaps that is why the tarp and hammock were so relatively inexpensive!
Equip Mosquito Hammock and Camping-Essential-Himal-Waterproof-Sunshade tarp.
|
2016-10-21 Well, I replaced the 12 inch pipes with 18 inch ones and added a third one so now the weight is shared by three guy wires instead of just two. So far so good. With all that work in it I had to string up my tarp as well as the hammock. I think the tarp is a bit short but perhaps it will work in all but a serious rain storm. The supports are now 15 ft apart which seems about right for this hammock. That allows a respectable distance at both ends for the tree straps and whoopee slings.
Now to work on an an under-quilt. I'm going to try to make one using the Packable Down Throw sold at Costco. My wife offered to sew the channels for the drawstring/shock cord for the ends. |
2016-10-21 Why hang your hammock over smooth ground with no sharp objects beneath? I found out this morning. One of my new post-tree guy anchors gave way and suddenly I was on the ground! Fortunately the ground was "nice" so no discomfort, just surprised!
Observation? twelve inches of 3/4 gas pipe is NOT ENOUGH in the rain softened ground. Back to the anchor drawing board, a bit wiser.
Observation? twelve inches of 3/4 gas pipe is NOT ENOUGH in the rain softened ground. Back to the anchor drawing board, a bit wiser.
2016-10-20 Well today a second tree sprung up in my back yard! It's four inches square and about seven feet tall. Since it was about thirteen feet from the one useful tree I had (for a hammock anyway), I strung my Equip Mosquito Hammock between the two and actually climbed in. It worked!
|
To make my new tree removable I drove a six-inch length of 3/4 in gas pipe into the ground where I want it to stand. Then I put a half inch steel pin into the bottom of the post. That keeps the bottom in place. I then went out six feet from the post and drove two more pipes at about a 30 degree angle from the center line. Those pipes I drove into the ground at a fairly steep angle away from the post. Next, I got a couple long eye bolts and stuck their tails into the two pipes respectively. Finally, I put a couple eye screws at about the six foot point on the post and using light cable and a level adjusted the lengths of the cables to hold the post vertical. To keep tension on the cables I put a ridge line from the top of the post to the tree.
|
|
The last step was to use my tree straps and the whoopee slings I made a couple days ago to hang the hammock. The only issue is that I wish I had moved the post another foot or so from the tree. Thirteen feet is a bit close for a 9-1/2 foot hammock, straps and whoopee slings. But it works! So, I can now say I have strung a hammock!
Step one toward actually sleeping in one!
Step one toward actually sleeping in one!
2017-10-17 My first hammock related purchase about a year ago was a $24 Equip Travel Hammock, Blue. I excitedly opened the package, laid it out on the floor and immediately realized, that with only one usefully located tree in the back yard, I had a problem! No matter, this was a dream so I stuffed and removed it from its attached pouch a number of times over the last year, imagining myself sleeping comfortably in the wild somewhere. The concept of under-quilts and top quilts gradually also came into focus. Those all seemed like solvable problems by using my Therma Rest self inflating sleeping pad and sleeping bag. But the mosquito net seemed less easily dealt with. So when I recently stumbled across a positive review of the Equip Mosquito Hammock for $39.86 I got one.
I've enjoyed watching many videos on YouTube about hammock hiking and camping. There are more options than for tents I think, and one can spend more than one fortune on hammocks, under-quilts, top-quilts, mosquito nets, suspension systems, tarps and more. I'm guessing as with all backpacking and camping gear you can start out with the bottom dollar things but as time goes, on if you honestly added up what you spent for all the things you buy and don't use as well as the ones you buy and do use, the result would be embarrassing. But then it is a hobby. No justification is required until you go bankrupt!