Martin's Site
  • Home
  • Ham Radio - K0BXB
    • Logging Contacts
    • The Shack
    • Operating Modes >
      • WSJT-X/FT8
      • DMR
      • D-STAR
      • Ultra Portable PSK/Digital
    • Antennas >
      • Comparing Antennas
      • The Artifically intelligent Antenna
      • Magnet Loop >
        • Mag Loop Overview
      • Portable Antennas >
        • 2 Meter Portable J-pole
        • Five Portable Antennas
        • End Fed Antennas >
          • End Fed Half Wave Antenna >
            • EFHW Summary
          • 29/35 foot end fed wire >
            • Balun or no Balun
          • 51 Foot End Fed Wire
          • 84 Foot End Fed Multi-band Antenna
        • Vertical Antennas >
          • Nine Foot Portable Vertical
          • Short Verticals >
            • DIY 40m -10m Short Vertical Antenna
            • QRPGuys DS1 40m -10m Antenna
            • Pac 12 Portable Vertical Antenna
            • Spiral Wound Vertical
          • 1/4 wavel 20 meter Veritcal >
            • DIY 6 Band Vertical
            • Make a KW4JM vertical
          • QRPGuys 3 Band Vertical
          • Silver Bullet 1000 TIA
          • Portable 17 ft. wire vertical
        • Other Portable Antenna Options
      • Dipoles/Inverted VEEs >
        • Off Center Fed Dipole OCD
        • Comparing the Trap vs. Fan Inverted Vee
        • Link Inverted Vee
        • Trap Antennas >
          • 20 & 40 meter trap dipole qrpkits
          • 40/20 Meter Trap-Inverted Vee
          • 17/20/30/40 Trap Inverted Vee
        • 40/20 Fan-Inverted Vee
        • 40 Meter Inverted Vee
        • G5RV
      • Base Station and General Antennas >
        • G5RV
      • Portable Masts
      • Antenna Test Gear >
        • NanoVNA
        • X5105 Antenna Analyzer
        • Field Strength Meter
    • Radios >
      • IC-705
      • IC-7300
      • XIEGU G90 >
        • G90 Go Kit
      • X5105 >
        • x5105 Go Kit
        • QRP (x5105) Statistics
        • Repairing Mic Cord
      • QRPLabs QCX Transceiver
      • Ten-Tec R4020 QRP Transceiver
    • Portable HF.... >
      • Pedestrian Mobile >
        • Ped Mobile Considerations
      • POTA - Parks On The Air >
        • Thots on POTA Activations
        • My Ideal POTA Kit
        • POTA - Lizard Mound State Park k-9704
        • POTA k-3383 Bald Mtn State Rec Area
        • POTA k-2314 Pine Lake State Park
        • POTA K-4429 Coronado National Forest
        • POTA K-4491 Superior Nat. Forest
        • POTA K-1440 Big Foot
        • POTA K-4265 Bong
        • POTA K-1437 Aztalan State Park
        • POTA - Ice Age Scenic trail K-4238
      • Ham Radio Field Days >
        • 2021 Field Day
        • 2021 Winter Field Day
        • 2020 Field Day
        • 2020 Winter Field Day-
        • 2019 Field Day
        • 2018 Field Day
        • 2016 Field Day
        • 2015 Field Day
      • 2020 Portable Ops
      • Thoughts on Portable Operating
      • Thoughts on Operating QRP/Portable
      • Portable Power
      • Portable CW Keys
      • Tuner/Matchbox >
        • ELECRAFT T1
        • Tuna Tunah II
        • EMTECH ZM-2 ATU
    • Going Mobile HF & VHF >
      • 2020 Mobile Installation
      • 2015 Re-install the Mobile
    • Miscellaneous Ham Radio Topics >
      • Baluns, Ununs, Etc.
      • Keeping wires and ropes untangled
      • Helping Others
      • Things Happen
  • Backpacking/Camping
    • 2020 Backpacking/Camping Season >
      • 2020 Oct Boundary Waters Trip
      • July 2020 Koehler-Andrea St. Park Birthday Camping Trip
    • 2019 Backpacking/Camping Season >
      • September 2019 High Sierra Camp Loop
      • August 2019
      • June 2019 Boundary Waters
    • 2018 Backpacking/Camping Season >
      • Oct 2018 Boundary waters
      • August 4-5, 2018 Wisconsin River Canoe Trip
      • July 16-18 Devil's Lake Birthday Campout
      • June 28-30, 2018 Backpacking/Camping
      • June 2018 ARRL Field Day Camput
      • April 2017 Ice Age National Scenic Trail
    • 2017 Backpacking/Camping Season >
      • July 2017 Camping at Timber-Lee Christian Campground
      • Cancelled Ice Age Trail Backpacking Trip
      • June 2017 Hiking/Backpacking/Camping >
        • Cave of the Mounds and Blue Mounds State Park
      • May 2017 Backpacking/Hiking/Camping >
        • May 19 Ottawa Lakes Campground
        • May 4-7 2017 Porkies Backpacking Trip >
          • Porkies Backpack Trip Day 1
          • Porkies Backpack Trip Day 2
          • Porkies Backpack Trip Day 3
          • Porkies Backpack Trip Day 4
      • April 2017 Backpacking/Camping/Hiking
      • March 2017 Hiking/Camping More Preparations
      • Feb 2017 Hiking/Camping
    • 2016 Hiking/Backpacking/Camping Season >
      • December 2016 Hiking/Camping
      • November 2016 Hiking/Camping
      • Oct 2016 Boundary Waters Canoe Area Trip
      • August 2016 Camping
      • July 2016 Hiking/Camping/Backpacking
      • June 2016 Hiking/Backpacking/Camping
      • May 2016
      • April 2016
    • Shelters >
      • Tents >
        • Reparing Tent Poles
      • Hammocks >
        • Hammock Stand >
          • Portable Hammock Stand
        • SnakeSkins or Sleeves vs. Stuff Sacks
        • Hammock Suspension
        • Keeping Warm in a Hammock >
          • Lite Top Quilt or Bag Liner
          • DIY Under Quilt
    • Glacier National Park 2015
    • Training for Glacier National Park Backpacking Trip
    • Backpacking Stoves >
      • Trangia 27-3 UL Stove >
        • Cooking with Trangia
        • ALOCS Trangia Look Alike Burner
      • Fancee Feest Stove >
        • Fancee Feest & Stanley Cook Pot
        • Another Cat Food Can Stove
      • DIY Alcohol Stove
      • DIY Igniter for Alcohol Stoves
      • Lexada Wood-Gas Stove
      • Wood Burning Backpack Stoves >
        • Emberlit Fireant
      • Gas Cannister Stoves
    • Backpacking Food >
      • Cowboy Coffee
      • Santa Fe Cheesy Beans and Rice
      • Healthy Instant Oatmeal Packets
      • Bacon Ranch Chicken Wrap
    • Other Gear
  • Adventures
    • 50th Anniversary In Alaska >
      • Day 1 Sites in Fairbanks
      • Day 2 Morning River Boat Cruise
      • Day 2 Afternoon travel to Denali
      • Day 3 Denali History Bus Tour >
        • McKinley Wilderness Princess Lodge Photos
      • Day 4 Coach ride to Anchorage/Whittier
      • Day 5 Ship Cruise at Yakutat Bay and Hubbard Glacier >
        • Photos of Yakutat Bay
      • Day 6 Galcier Bay
  • RC Planes
    • 2019 Flying Season
    • 2018 Flying Season
    • 2017 Flying Season
    • 2016 Flying Season
    • 2015 Flying Season
    • Great Planes Escapade - .40 size
    • T-6 Texan
    • Cessna 170
    • Fokker V.23 WWI Combat Sport Scale Plane
    • Great Planes PT-40 Trainer
    • Great Planes Combat Spitfire
    • Hobbico TWINSTAR
    • Other Planes >
      • Flite-Test FT-Cruiser
      • Micro Fokker Eindecker by Dave Robelen
    • Things I've learned....
  • About
    • July 12, 2017 Flood
  • Other....
    • Remembering Charles & Eva >
      • Feist Family Photos
  • KW4JM Contact Log

Modified DIY Underquilt

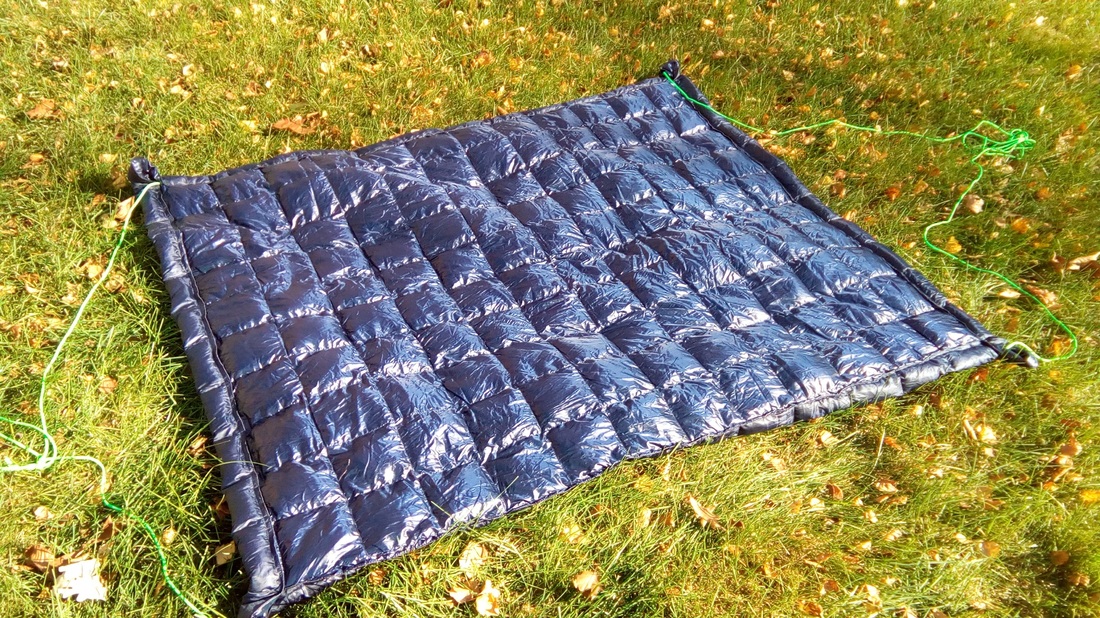
2017-02-24  Well, the "new" underquilt is finished, at least I'm finished adding down/feathers to it. The untouched Costco Packable Down Throw weighed 15.5 oz in its stuff sack. My modified one weighs 20.06 oz. The original measured  56x69 inches. My modified one measures 56x48 inches. I removed stitches in the long direction so that I ended up with 11 tubes 5 inches wide and 56 inches long. The removed fabric weighed 2 ounces so I effectively added 6.5 oz of filling. The loft is about 3 inches. I have not tested it yet so really don't know what I've gained except some experience which may or may not be useful!
Lessons learned? I'll probably not do this again. Not that it was so painful, but it was very time consuming and I don't know whether the end result will be worth it. It probably still won't be a fully stand alone under quilt below about 35 degrees. Also, the thrift store jacked had a 60% feather, 40% down mixture. Not sure how significant that is. The good news is, I did it!
2017-02-18 After "freezing" the other night I started thinking about and playing around with my DIY Costco Packable Down Throw underquilt again. (Look below for previous work on this.) At a local thrift store I found a nice 80% down filled jacket to replace another one I had and began wondering about moving fill from the replaced coat to my underquilt. Yesterday I decided to remove all the cross stitching from the throw. Following a tip I saw online (snip the "straight through" thread rather than the looped thread which allows you to remove maybe a foot or more of seam with one pull), I was able to remove the seams pretty quickly. I also got to thinking about a 3/4 length UQ rather than a full length one. Checking a number of vendors of shorter UQs I found that about 48 inches wide by 55 or so inches long is in the ballpark. Next was figuring out how to remove three full length tubes from the Costco throw, transferring the down from them to the remaining tubes.
Picture
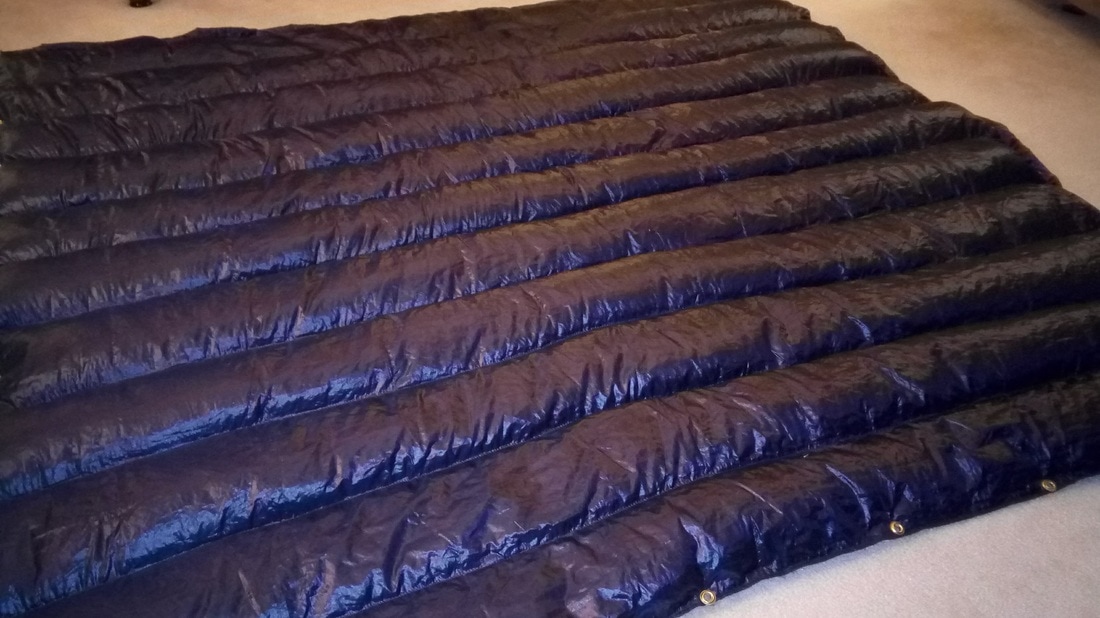
My modified Costco Packable Down throw. 56"x48" About 3" loft. 20oz.
After trying a couple different approaches I managed to transfer the down from those three edge tubes to the three middle tubes and then cut off those three tubes. I ended up using the funnel described below. Now I have to think through how to harvest down from that jacket for the remaining tubes. I can tell already it will be a mess, but it should also be an interesting undertaking! And it may take a month to get all the stray down out of my nose!
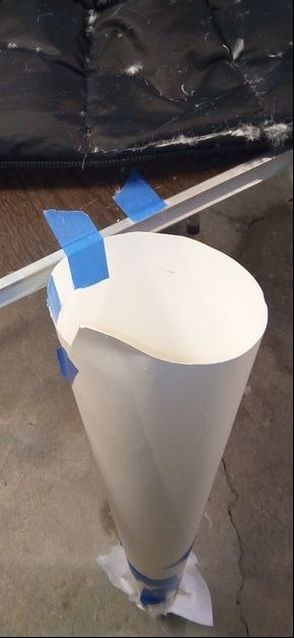
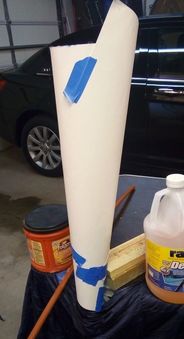
The picture below shows my final setup to capture down (and feathers) from both the edge tubes of the throw and from the old jacket I found at a local thrift store. It is a piece of poster board rolled and taped to form a funnel. The top is roughly the width of the tube of down in the jacket and the bottom is about 2-1/2 inches across and fits nicely into a slit in the end of a tube in the costco throw. At first I put a paper towel over the bottom to keep the down from coming out but discovered the down stays in without it so that made the process even simpler. 
Picture
My setup to remove down from an old jacket. The painter tape keeps the top in place on the edge of the table while the bottom sits on the garage floor.
To remove the down from the jacket I carefully cut the zipper and end of each chamber from the jacket, cut a small slit in the opposite end of the chamber and then with the open end over the funnel worked the down out using the piece of pvc pipe. Fortunately most of the down and feathers were heavier than air and there was no breeze so it fell into the funnel fairly willingly. My kind wife graciously sewed a hem across the end of the throw to seal the tubes I had slit to insert the down. She also sewed a new side seam where I had removed three empty tubes after transferring their down to the three center tubes in the modified throw.
Picture
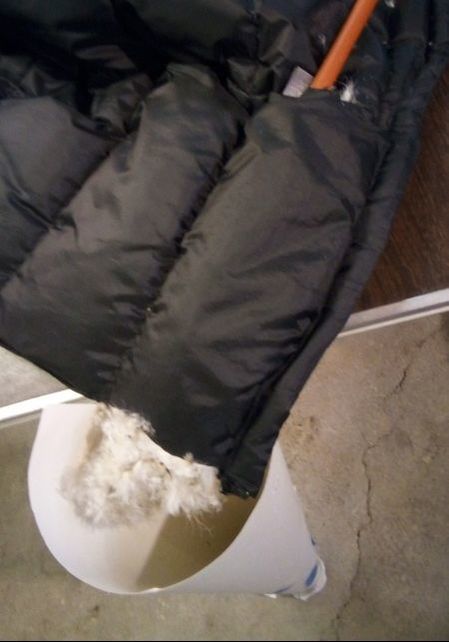
An amazingly small amount of down and feathers escaped the process. But you would NOT want to do this in the house!
Picture
The funnel inserted into a slit in the end of a tube in the down throw which is held in place by the coffee can (filled with salt for my sidewalk) and the jug of windshield de-icer. I use the piece of pvc pipe to poke it from the funnel into the tube in the throw. A simple but elegant solution!

DIY Underquilt using a Costco Packable Down Throw (First Attempt)

2016-10-23 Yesterday my wife turned a Packable Down Throw sold at Costco into an underquilt. The down is stitched into roughly 4" squares so she flipped one edge over and sowed the outside seam to the 4" stitching that formed the first 4" row. The result is a two inch channel on all four sides, open at the corners. I threaded fifteen feet of 550 nylon Paracord through the long sides to act as the primary suspension. then I'll add shock cord to the ends which can be adjusted to snug them up against the bottom of the hammock.
PictureCostco Down Throw with the channels sewn in and green 550 paracord inserted.

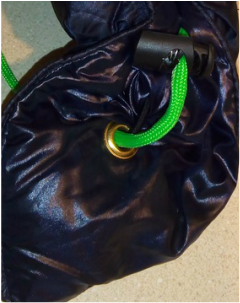
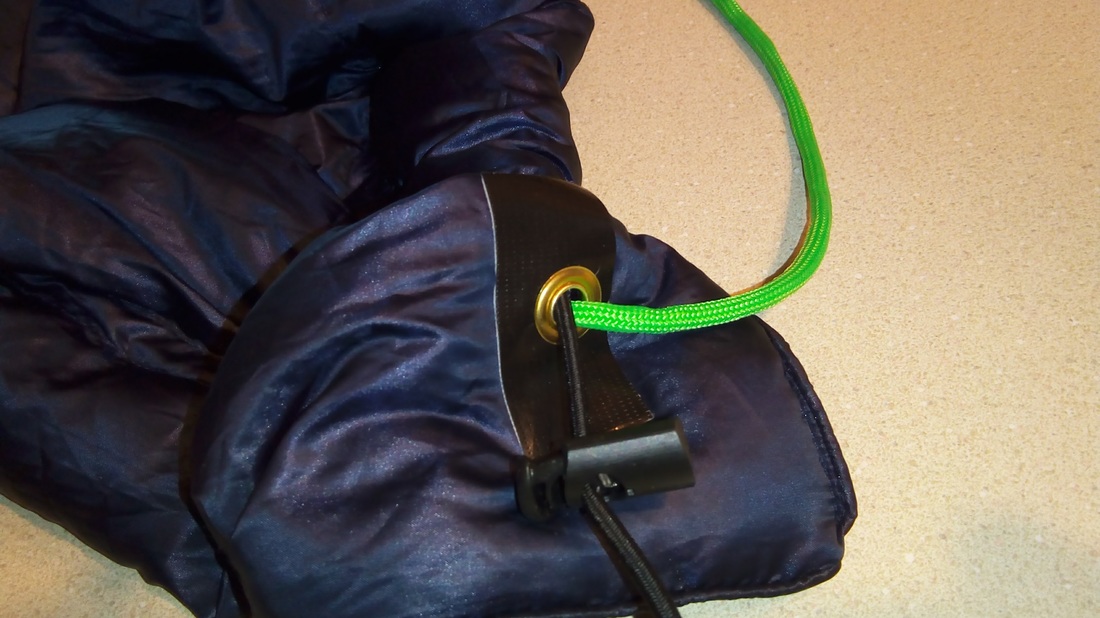
I installed brass grommets at each corner to string the shock cord through. On the long sides I have 550 paracord threaded through the grommet from the outside, then through a cord lock, into the sewn in channel and tied to a foot long section of shock cord. ​From the other end of the shock cord another length of paracord ​​continues through the channel and a cord lock and then through the grommet and out the other end. ​
On one end of each long-side paracord I tied a fixed loop which is attached to a carabiner that in turn clips onto the hammock suspension at the end of the hammock. At the opposite end I did the same thing only with an adjustable loop so I can experiment with how long the combined paracord and shock cord need to be for my setup. At some point I may change that to a fixed loop as well. The cord locks on the inside of each corner grommet allow me to move the underquilt toward the head or foot end of the hammock and then lock it in place.
On the ends I have a length of shock cord that goes from side to side and through the grommet on the two respective corners. Outside the grommets I put cord locks on the shock cord and finally tied a not. This allows me to gather the underquilt up against the hammock.
Picture
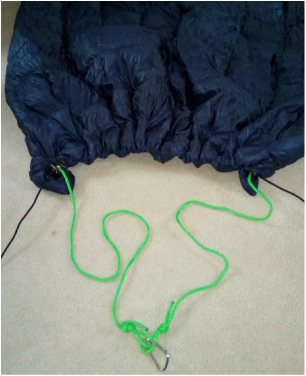
Green paracord for suspension and black shockcord gathers the ends.
PictureCord lock on the paracord on the internal side of the underquilt.

​

Picture
Cord Lock on the shock cord to allow gathering the end of the underquilt.
Picture
Corner detail of the underquilt.
It is all untested at this stage but I'm optimistic that it will work for moderately cold weather. If not, minimal damage has been done to the throw so it can be used as a throw.
Proudly powered by Weebly